
Gophish is an opensource phishing framework which focuses on: automating email distribution using groups, email generation by using templates, importing and hosting landing pages and combining all the different aspects of a phishing operation as a single campaign with live statistics.
1. Installation
I installed Gophish on a DigitalOcean Droplet, the machine is a basic $5/month Debian 10.X.
First I used wget to download Gophish from GitHub
Next I ran a simple unzip gophish-v0.8.0-linux-64bit.zip command to extract the archive and removed the download with rm gophish-v0.8.0-linux-64bit.zip.

2. Configuration
The Gophish management interface is a web application, for it to be remotely accessible I made some changes to the config.json file using nano config.json and set the listen_url for the admin_server to 0.0.0.0:3333.
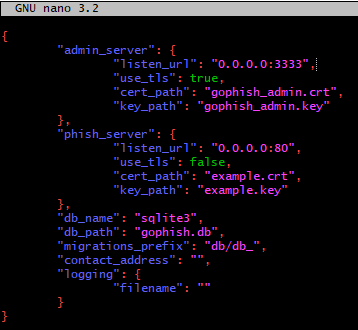
Next up I made sure only I can modify the config file using chmod 640 config.json and made the gophish script executable using chmod +x gophish.
With that out of the way, I can start my Gophish server using ./gophish. If you’d like to run Gophish as a service on Linux, feel free to check out this GitHub Issue.
With Gophish set up and running, I can now navigate to the web interface on https://16x.2x.x.x:3333, I will ignore the invalid certificate warning, because our SSL certificate for the admin panel is self signed. I can login with the default Gophish credetials: admin:gophish and change the default password to something more secure.
3. Execution
Using Gophish for the very first time, there seems to be a right-to-left workflow. I will start with:
- Setting up a Sending Profile
- Creating a Landing Page
- Creating an Email Template
- Creating User Groups
- Starting a Campaign
- Monitor the results
3.1 Setting up a Sending Profile
A sending profile defines the email account phishing mails will be sent from, and the SMTP servers and settings associated with that account. For test purposes I’ll be using an Outlook account.
| Parameter | Value |
|---|---|
| From | Your Name <your.name@your-email-provider.extention> |
| Host | smtp-mail.outlook.com:587 |
| Username | your.name@your-email-provider.exention |
| Password | your email password |
To create a new Sending Profile, I’ll click on the +New Profile button, give it a name, and add my data.
3.2 Creating a Landing Page
A landing page is the webpage a target will arrive after clicking the malicious link in the email. I can create my own website, or clone an existing one. To create my new landing page, I’ll click on the +New Page button, give it a name, and clone an existing webpage. I’ll also tick the Capture Submitted Data and Capture Password boxes, as we want to collect login credentials entered on our site. Finally I’ll also redirect my victims to the real version of my webpage.
3.3 Creating an Email Template
Gophish will use an email template to generate custom emails for all the target users. Just as with the landing page, I can create my own email using text or html, or I can import an existing email. I’ll import an existing email and modify it to my needs using the following special variables:
| Variable | Description |
|---|---|
| {{.Rid}} | The target’s unique ID |
| {{.FirstName}} | The target’s first name |
| {{.LastName}} | The target’s last name |
| {{.Position}} | The target’s position |
| {{.Email}} | The target’s email address |
| {{.From}} | The spoofed sender |
| {{.TrackingURL}} | The URL to the tracking handler |
| {{.Tracker}} | An alias for <img src="\{\{.TrackingURL}}"/> |
| {{.URL}} | The phishing URL |
| {{.BaseURL}} | The base URL with the path and rid parameter stripped. Useful for making links to static files |
3.4 Creating User Groups
To send out phishing emails, I need to create user groups that tell Gophish where to send the email, the name of the target and their position within the company they work for.
I’ll create a new group by using the left-hand menu, and clicking on the +New Group button. Next I can enter my victims email address, first name, last name and position. Alternatively I can import a large amount of target addresses from a .csv file.
3.5 Starting a Campaign
With all the different building blocks done and in place, I can now create a new campaign, name it, select the different items I created earlier and launch it. The emails will be generated and send out by Gophish, our landing page will be online and I can sit back, relax and monitor the dashboard to see the progress.